Fresh Leaf Indigo Tutorial (Persicaria Tinctoria)
- annacarolynmeier
- Aug 27, 2020
- 10 min read
Today I'm going to share three different ways you can use Japanese Indigo leaves that have been freshly picked. I'm super excited to have both a video tutorial, and a ton of info in this post to offer you in your own journey to making a gorgeous range of mermaid blues!

Japanese indigo dyed hands with Japanese indigo in my garden
I didn’t immediately love the deep navy blues of indigo dyeing when I first learned about it. When I watched the process of indigo vat dyeing I wished I could preserve the color of the blue-green transformation that took place as the indigo began to oxidize. With time I’ve come to deeply love all the many shades of blue that indigo contains, but when I discovered that indigo leaves could be used fresh to attain the range of aqua and turquoise hues that I had always wanted, I knew I had to to try it.

Wool yarn just dipped in a bowl of liquified Japanese Indigo
Of course at the time I had no access to indigo and no place to grow it. Now three years later I’ve managed to cram over a hundred Japanese Indigo plants into my tiny backyard, and my heart is very happy to have so much to play with. After two summers of experimenting with the fresh leaf method I’ve learned a few different ways to work with them, and I’ll be sharing three different methods that I've tried. I also made a short video tutorial that covers the basics of the process. If you’re interested in more of the specifics, especially regarding the chemical reaction and mordant choices, I’ll cover all that later on in this post.
Watch the Tutorial
The Indigo
Indigo is a blue pigment found in the leaves of over 300 species of plants worldwide. Only a few of these species actually produce enough of the pigment to warrant collecting it for dye purposes. The species I use for this process is Japanese Indigo or Persicaria Tinctoria also known as Polygonum Tinctorium. Japanese Indigo is an annual that is easy to grow from seed in most temperate areas. I live in zone 9b which has very hot dry summers so I usually start my indigo much earlier in the season than people living in locations with harsher winters and wetter summers, but the plants do well in either climate.

Japanese Indigo (Persicaria Tinctoria) leaves
I’ve found that the plants do not like dry weather so I make sure to mulch them well, plant them in partial shade, and water frequently, but this would not be as necessary in a climate that was more humid, with summer storms. I harvest fresh leaves from my plants every few weeks during the summer, starting in May and ending in late September when the plants are fully flowering.

Japanese Indigo freshly harvested from the garden
The leaves hit peak pigment production right at flowering but a good amount of pigment can still be extracted using the fresh leaf method before then. I cut the stems right above where I see new leaf growth, about 4 or 5 inches from the ground to allow for the plant to regrow. Indigo loves to be pruned and will grow back even more vigorously after being trimmed. Once the leaves are harvested you’ll need to work quickly, or cover your indigo with water and refrigerate it to preserve the chemical compounds in the leaves (I’ll go over why further down in the chemistry section).

Trimming Indigo plants to use in a fresh leaf dye bath
Japanese indigo is incredibly easy to propagate from cuttings. After you have harvested the leaves, the stems can be put into a container of water, and within a few days they will have sprouted new roots. I top all my indigo plants in the early spring, let the tops sprout in water and then plant them back into the garden for even more indigo goodness.
Fibers and Mordanting
The fresh leaf process works best on protein fibers like silk or wool. They require no mordant, and will produce a range of teals and turquoises. Plant fibers can be dyed successfully but adding a soy binder and/or a layer or tannins will help deepen the color. In the finished samples you can see how alum, soy, and oak gall tannins all affected the final color outcome on the cellulose fibers. This process works well on wood and paper as well, especially if they have had a soy milk binder applied beforehand.

A selection of different fibers dyed with fresh indigo from my garden.
The Process
There are two main ways that fresh indigo leaves are processed. The first method is done by rubbing the leaves with salt and then adding the fabric, the second method is to blend the leaves with very cold water and then add your fibers to that solution. The third method is a hybrid version, where salt is added to the blender method. I’ve outlined the steps for the three processes below. For all three of these experiments I used 230 grams of Indigo leaves (separated from stems) to dye approximately 35 grams of fiber. The amounts are very flexible, I used a ratio of 6:1 but as long as you have a ratio of at least 2:1 leaves to fiber you should be fine.

Adding salt to the mixture helps to draw the moisture out of the leaves and intensifies the color
Method #1 Indigo +Salt
What you’ll need:
Indigo Leaves
A large bowl, or mixing container
Salt (any kind will do)
Fabric or fibers to dye
A bucket or container of water for soaking your fibers
Gloves (optional)
Soak the fabric or fibers you are using in water for at least 1 hour or up to overnight
Gather your indigo (preferably in the morning before the sun hits them) and strip the leaves from the stems
Once you have your leaves, add them and the salt to the bowl (I used 1 tablespoon of salt for 230 grams of leaves)
Begin to massage the salt into the leaves, gently crushing them with your hands until they begin to release their liquid.
Add your wet fabric to the bowl and begin to massage it into the leaf mixture
Continue to work the fabric and leaves together until the fabric changes from a light green to a darker turquoise. The color will continue to change and turn more blue as it is exposed to oxygen. Once you are happy with the color remove the fabric, rinse (rinsing under water will help the fabric oxidize and remove leaf material) and hang to dry in the shade. The leftover indigo can be composted (the amount of salt is small enough not to be harmful).

A mix of silk and wool fibers that have been rubbed with indigo leaves and salt
A few notes about the salt rub method:
This method is incredibly simple and requires the least amount of equipment but it does have a few things to consider. Because the process uses the whole leaves, be aware that bits of the plant material can get stuck in delicate or textural fibers like silk or wool. The method also uses no liquid other than what the leaves produce so it can be difficult to get even coverage on large pieces. The final consideration is agitation. This method requires that the fibers be moved around constantly in order to be dyed so it is not recommended for wool pieces or yarn that could be easily felted. I have dyed small quantities of wool fabric and yarn with this method, but I’ve found that the feel of the fiber is better preserved using the blender method.

Freshly blended indigo leaves, the green color comes from chlorophyll which does not provide a source of pigment.
Method #2 Indigo + Blender
Indigo Leaves
Cold Water
A blender
Fabric or fibers to dye
A bucket or container of water for soaking your fibers
Mesh Sieve
Bowl or container for straining mixture into
Cheesecloth or cotton gauze
Wooden spoon/Stirring implement

Straining the blended mixture helps separate out the small leaf bits that would otherwise get stuck in your fabric
Soak the fabric or fibers you are using in water for at least 1 hour or up to overnight
Gather your indigo (preferably in the morning before the sun hits them) and strip the leaves from the stems
Once you have your leaves, add them to the blender and cover with very cold water (I like to use water that has been refrigerated but you can also add ice to water as well) and blend until you’ve reached a smoothie-like consistency. You may need to blend in batches depending on how much indigo you are using and what the capacity of your blender is.
Line a sieve with cheesecloth or cotton gauze, place over your bowl or container and pour the indigo mixture through. The mix contains a lot of leaf particles so using a wooden spoon or another utensil to push the liquid through the sieve can help speed up the process.
Once the mixture has been strained, the left-over leaf bits can be composted or applied directly to another textile for a mottled effect.
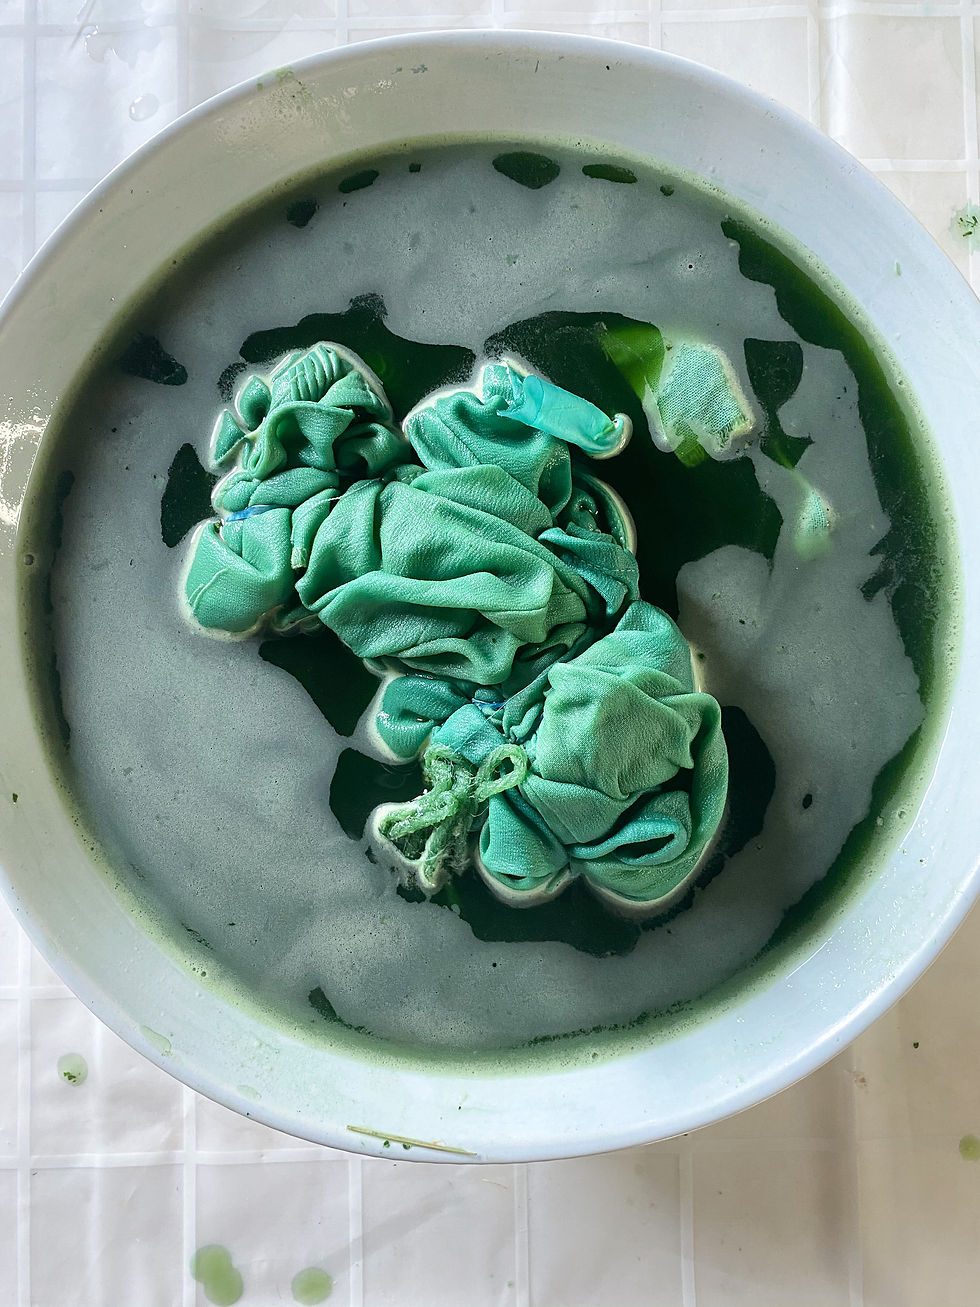
Add the wet fabric to the strained liquid in the bowl and begin to move it around to ensure even coverage.
Once you are happy with the color remove the fabric, rinse and hang to dry in the shade. The leftover liquid can be used to water the garden, or composted.

Silk/Rayon Velvet freshly dipped in blended indigo. The color of the velvet will continue to oxidize and turn from green to a light aqua blue.
A few notes about the blender method:
This method requires the use of a blender. Old blenders, perfect for dye purposes, can be easily found at thrift stores and second hand shops. This method uses more liquid so it works well for large pieces, shibori pieces or anything with lots of detail or delicate pieces. This process yields a lighter and slightly bluer shade than the salt method, if you want the deeper colors of the salt method with the liquid of the blender method try the hybrid method described next.
A thrifted silk shirt being dyed for a second time with fresh indigo
Method #3 Indigo + Blender + Salt
Indigo Leaves
Salt (any kind will do)
Cold Water
A blender
Fabric or fibers to dye
A bucket or container of water for soaking your fibers
Mesh Sieve
Cheesecloth or cotton gauze
Wooden spoon/Stirring implement
Soak the fabric or fibers you are using in water for at least 1 hour or up to overnight
Gather your indigo (preferably in the morning before the sun hits them) and strip the leaves from the stems
Once you have your leaves, add them to the blender, add the salt (I used 1 tablespoon for 230 grams of leaves) and cover with very cold water (I like to use water that has been refrigerated but you can also add ice to water as well) and blend until you’ve reached a smoothie-like consistency. You may need to blend in batches depending on how much indigo you are using and what the capacity of your blender is.
Line a sieve with cheesecloth or cotton gauze, place over your bowl or container and pour the indigo mixture through. The mix contains a lot of leaf particles so using a wooden spoon or another utensil to push the liquid through the sieve can help speed up the process.
Once the mixture has been strained, the left-over leaf bits can be composted or applied directly to another textile for a mottled effect.
Add the wet fabric to the strained liquid in the bowl and begin to move it around to ensure even coverage.
Once you are happy with the color remove the fabric, rinse and hang to dry in the shade. The leftover liquid can be composted.

Thrifted silk shirt and silk shibori scarf drying on the line. Indigo is light sensitive so make sure the dry the pieces in the shade.
The Chemistry
You can absolutely do this process without understanding the chemical reactions in the process, but if you are interested in learning exactly what magic is happening to create this gorgeous dye, here is the low down.

Indigo leaves that have been freshly picked
Every leaf contains the pigment Indican in the vacuoles, and an enzyme called Beta Glucose (β-D-glucoside) in the chloroplasts, when the leaves are crushed or pulverized the two compounds meet and form the pigment Indoxyl (this process is called hydrolysis).

This is a Japanese indigo leaf that has been pounded into fabric with a hammer. You can see how crushing the leaf releases the pigment and beta glucose to form indoxyl and creates a blue green print of the leaf
Indoxyl is the source of the beautiful blue/green color that we are after in this process. The reason we need to work quickly is that Indoxyl only exists while the Beta Glucose is present, once it evaporates the Indican is left on its own and switches into Indigotin. Once the pigment has become Indigotin, it is no longer soluble in water and is only available to dyers by reduction in a vat, where it then becomes Leucoindigo and is once again available to attach to fibers.

Thrifted raw silk dyed with the blender method. Protein fibers like silk and wool take the color very well
Because of the time sensitive nature of the chemistry, multiple shades of blue can be achieved by adding fibers in at different stages in the bath. In the first stage fibers will be a deep turquoise or teal. As the Beta Glucose evaporates and the Indoxyl fades, lighter shades of blue are possible. When fibers are introduced at the end of the bath, once most of the pigment has turned to Indigotin, light shades of green are achieved.

Cotton gauze dipped at the end of a blender bath, the beta-glucose has mostly evaporated and there is very little pigment still available resulting in very pale shades of green. This piece was also mordanted with alum which tends to push the dye green as well.
I also tested leaves that had been picked the day before, submerged in water and refrigerated. In the case of both methods the day old leaves seemed to work just as well as the fresh picked leaves, in fact in some cases the color of the samples was actually more saturated, than the samples using fresh picked leaves. This might be because the day old leaves were very cold from the refrigeration, while the fresh picked leaves were warm from the ambient temperature. Cooling the leaves before using might help if you live in a very warm climate like I do.

Indigo leaves can be kept refrigerated overnight if need be
It also may be useful to store the day old leaves in the refrigerator without any water, I haven’t tried this method, but it may work to keep the leaves cold while preventing any water extraction of the pigment to begin. This didn’t seem to be a problem, probably because it was in a very cold environment, but it is another option to test.
The Results
Method #1 Indigo +Salt

The salt rub method produces deep colors, especially on silk and wool. It works on wood and paper as well but it's difficult to get even color coverage. If using on cellulose fibers, adding a layer of tannin on top of, or in the soy milk binder really helps to deepen the color.

Method #2 Indigo + Blender


The colors from the blender method are a bit lighter and a bit more aqua than the salt rub method. This method works great for shibori pieces and gives more even coverage when dyeing wood or paper.
Method #3 Indigo + Blender + Salt

This hybrid method provides the liquid from the blender method with some of the color intensity of the salt rub. Adding the salt seems to deepen the color somewhat but not as intensely as the salt rub method alone.
Method #1 Salt + Indigo with day old leaves

Method #2 indigo + blender with day old leaves

More information and resources
There are some really great resources around this process. Here are a few to get you started.
Great tutorials and explanations on the chemistry:
The Dogwood Dyer
Rebecca Desnos
FiberShed
Places to source Japanese Indigo Seeds:
Grand Prismatic Seed
Graham Keegan


How do you care for the garments post dye?
Ditto..! Thanks do much for sharing in such detail! The photos are great showing the different processes on the different fibers!
Is there a way to capture the green turquoise before it oxidizes to the blue turquoise? I’m thinking maybe immersion if the piece into warm/hot water immediately when the right green turquoise is obtained and then leaving it to cool off for a few hours submerged in the water then ironing it immediately when one remixes ur from the water??? What do you think?
This is by far the best and most comprehensive fresh leaf tutorial I've come across - thank you!